The Ultimate Video Editing Guide | From Raw Footage to Masterpiece
Hey everyone!
I’ve decided to put together a comprehensive guide for anyone looking to try their hand at video editing—to make the process smoother, more intuitive, and help you dive deeper into the craft. Whether you are aiming to earn subscription rewards or create memorable gaming montages, the tips and workflows shared here will help you level up your videos instantly. Grab some coffee or tea, maybe a few cookies, and let’s dive in!
This guide is divided into five core sections covering everything from recording software and editing techniques to audio syncing, transitions, rendering codecs, and thumbnail design.
---
Part 1: Picking the Right Recording Software
There are plenty of ways to record your gameplay (including cheat overlays). Some tools are lightweight and simple, while others are heavier and feature-packed.
My personal favorite is Nvidia ShadowPlay, which allows you to capture instantaneous 45–60-second replay clips right after the action happens. This feature is integrated directly into the Nvidia App / GeForce Experience for all Nvidia GPU owners.
Second Option: OBS Studio
OBS Studio is a fantastic, versatile tool for streaming and high-bitrate screen recording. It offers complete control over encoders, canvas resolution, and audio tracks. While OBS allows you to embed watermarks directly during recording, I recommend adding watermarks during the editing phase instead to keep your raw footage clean and flexible.
Third Option: Xbox Game Bar
Built directly into Windows 10 and 11 (Win + G), this lightweight tool makes quick captures effortless without installing extra software. However, it offers limited bitrate and audio control, so stick with ShadowPlay or OBS if you want maximum visual fidelity.
Other Recording Alternatives:
Here are additional recording tools you can explore depending on your hardware:
AMD Software: Adrenalin Edition (Radeon ReLive)
Action! Screen Recorder
FBX Game Recorder
Bandicam
Wondershare Filmora
Fraps
XSplit
Dxtory
Camtasia
---
Pro Tip: Resolution Matters
Always record in at least 1080p (1920x1080)—or higher if your hardware allows. Recording at 1440p (2K) or 4K gives video platforms like YouTube much more data to work with, triggering superior compression codecs (explained in Part 4).
---
My 4K Recording & Editing Rig Here is the PC configuration I use to record and render smooth 4K gameplay videos:
Core Components:
CPU: Intel Core i7-13700F (up to 5.2 GHz)
Cooler: DeepCool LT720 360mm AIO Liquid Cooler
Motherboard: MSI MAG B760 Tomahawk WiFi
RAM: G.Skill Trident Z5 RGB DDR5 32GB (2x16GB)
Storage: Samsung 980 Pro 1TB NVMe SSD & Samsung 980 Pro 2TB NVMe SSD
Graphics & Power:
GPU: MSI GeForce RTX 4070 Ti GAMING SLIM (12GB)
PSU: Gigabyte UD850GM PG5 (850W Gold)
Peripherals & Display:
Case: Cougar Duoface Pro RGB
Monitor: MSI Optix MAG281URF (28" 4K UHD 144Hz)
---
Part 2: The Art of Video Editing
Spoiler for Part 2: Video Editing:
Choosing Your Editing Software
Picking the right editor comes down to personal workflow. I started with Sony Vegas Pro (now Vegas Pro), but eventually transitioned to Adobe Premiere Pro for timeline editing and Adobe After Effects for advanced logo animations and visual effects.
Recommended PC Editing Software:
Adobe Premiere Pro (Industry standard, highly recommended)
DaVinci Resolve (Incredible free version, industry-leading color grading)
Vegas Pro (Fast timeline workflow)
Final Cut Pro (macOS only)
Wondershare Filmora (Beginner-friendly)
CapCut Desktop (Fast and versatile)
Shotcut / Kdenlive (Free and open-source)
HitFilm / Movavi Video Editor
---
Concept & Storytelling: Editing Begins Before You Record
Before hitting the record button, ask yourself: What story am I telling?
Our goal is not just to earn subscription days—it is to create a captivating, cohesive video that viewers will enjoy watching from start to finish.
I wanted to create a hybrid montage blending cinematic trailer sequences with high-intensity cheat gameplay—merging cinematic atmosphere with raw in-game action.
2. Music Selection (The Heart of the Edit)
Music dictates the entire pace of your video. For this project, I drew inspiration from Geoff Keighley's Summer Game Fest Hype Trailer: Watch Inspiration Trailer
I matched five featured games to the crescendo of the music track to create maximum impact.
Music & Copyright Guidelines: If you want to avoid copyright strikes or muted audio on YouTube:
Use royalty-free music libraries (e.g., Epidemic Sound, Artlist, StreamBeats by Harris Heller).
Utilize the YouTube Audio Library (free and 100% safe).
Use licensed creator music services like Lickd.
3. Gathering Footage (The Quality Grind)
Great edits require patience. Do not settle for mediocre clips—record multiple sessions over several days to capture genuine highlight moments. 10 seconds of thrilling gameplay beats 5 minutes of repetitive filler.
4. Timeline Audio Mapping
Import your music track into Premiere Pro first. Listen through and press M to drop timeline markers on every major beat, bass drop, and vocal transition. These markers become your visual roadmap for cuts and transitions.
5. Transitions & Flow
Every transition should feel natural and motivated by on-screen motion. Match camera pans, weapon fire, or environmental explosions between clips to maintain visual continuity.
---
My Go-To Transition Techniques (With Timestamps):
Weapon Reload Cut:Watch Example (Cuts on the weapon reload motion)
Crosshair Snap Swap:Watch Example (Transitions as the player snaps aim)
Sniper Scope Zoom Transition:Watch Example (Zooms into the scope lens into the next scene)
Smoke Fade:Watch Example (Fades through smoke grenade effects)
Explosion / Muzzle Flash Wipe:Watch Example (Wipes on a bright explosion frame)
Doorway Light Flash:Watch Example (Uses environmental lighting changes)
---
Golden Rules of Montage Editing
1. Sync or Sink: If a clip does not align cleanly with the music, re-time it or find a better clip. 2. Don't Overuse Flashy Transitions: Subtle cuts that preserve flow always beat random screen spins. 3. Take Breaks to Avoid Burnout: Step away from your edit for a few hours. When you return with fresh eyes, pacing flaws become obvious immediately.
Archive Channel:4tech956 Vintage Archive (My early 2014 rookie videos—great for seeing how much editing style evolves over time!)
---
Part 3: Post-Production & Thumbnails
Spoiler for Part 3: Post-Production:
A great video deserves an equally great thumbnail. Thumbnails and titles are the first things viewers see. A clean, eye-catching thumbnail is an essential part of the production cycle.
How to Design a Killer Thumbnail:
Custom Photoshop Design: Extract high-res action frames, apply subtle drop shadows and outlines, enhance color vibrancy, and add the SystemCheats logo.
Frame Freeze Method: Take a dramatic screenshot from your footage, apply background blur/darkening, add bold readable text, and place the official watermark.
Canva Templates: Free and fast graphic design tool with pre-made YouTube thumbnail templates: Canva.com
Download My Thumbnail PSD Templates
Download my personal layered Photoshop template files to jumpstart your own designs: Download Link:Download PSD Templates (MEGA) (Note: Layer names may be in Russian, but layer structures are organized and easy to navigate!)
---
Optimizing Your Video Title & Description
Always include the game name and "SystemCheats" in the title. In the description, include key features and links back to the official cheat page on SystemCheats to boost search visibility and provide context for viewers.
---
Part 4: Technical Settings, Bitrates & YouTube Codecs
Spoiler for Part 4: Technical Settings:
1. The 1080p to 2K (1440p) Upscaling Trick Always render your final video at 1440p (2K) or 4K, even if your raw gameplay was recorded at 1080p.
Why does this matter?
YouTube re-encodes all uploaded videos. 1080p uploads are automatically assigned the low-bitrate AVC1 codec, causing heavy compression artifacts and blurriness in fast-paced shooter games. Uploading at 1440p (2560x1440) or higher forces YouTube to encode your video with the superior VP09 codec, delivering dramatically sharper details and crisp text.
---
Understanding YouTube Video Codecs:
1. AVC1 (H.264) – Low Tier Codec
Assigned to: Standard 1080p uploads and smaller channels.
Drawbacks: Heavy compression artifacts, pixelation during rapid camera movement, and blurry UI/killfeeds.
2. VP09 – High Quality Standard (Target This!)
Assigned to: Videos uploaded at 1440p (2K) or 4K resolution, as well as high-traffic 1080p videos.
Benefits: Retains sharp edges, smooth gradients, and clear particle effects.
How to get it: Export and upload your video at 2560x1440 (2K) or 3840x2160 (4K).
3. AV01 – Next-Gen VIP Codec
Assigned to: Ultra-popular channels (e.g., MrBeast) and high-priority trending 4K/8K content.
Note: Provides slightly better compression than VP09, but VP09 is already more than sufficient for stunning quality.
---
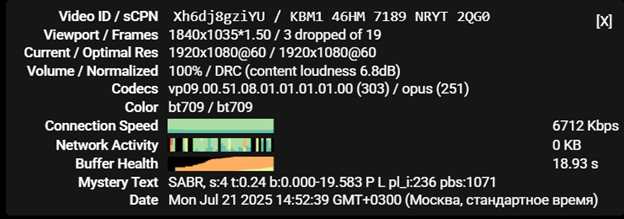
How to Check Which Codec YouTube Gave Your Video:
Open your published video on YouTube.
Right-click the video player and select "Stats for Nerds".
Check the "Codecs" line:
- vp09... = High quality (Success!)
- avc1... = Compressed (Upscale to 1440p next time)
Congratulations on making it through the guide! Whether you are a beginner picking up your first editor or an experienced creator polishing your workflow, I hope these tips help you create outstanding gameplay videos.
Spoiler for Part 5: Resources & Templates:
Core Summary Checklist:
Plan Ahead: Define your concept and match pacing to your soundtrack before cutting.
Sync Audio: Map markers to the beat drops and transition on natural movement.
Render Smart: Always export at 1440p (2K)+ to unlock YouTube's VP09 codec.
Polish Visuals: Add watermarks, clean intros/outros, and an eye-catching thumbnail.
---
Bonus: 4K Intro & Outro Templates
For creators editing in 4K, I have rendered a seamless 4K composite containing the official SystemCheats Intro and Outro: Download Link:Download 4K Intro/Outro Package (MEGA)
---
Need Feedback or Advice?
Feel free to ask questions in this thread if you run into editing hurdles or need feedback on your draft videos!
---
Thanks for reading, and happy editing!
Guide by Hennessy #SystemCheatsFamily
Last edited by Psychopath; 08-23-2026 at 01:04 PM.
Reason: Fixed <3

 Products Media


 The Ultimate Video Editing Guide | From Raw Footage to Masterpiece

 Reply With Quote
